One of the most common things computer user’s do is cut, copy and paste stuff. When you’re cutting or copying from one place in a document to another, there’s not much to the story; when you’re cutting or copying text from a website perhaps, to a Word document on the other hand, things get a bit stickier, because sometimes you do want the copied text to look as it did on the website, and sometimes, you just want it to fit in seamlessly with what you’re already writing.
Microsoft has not been blind to this and did give us some options for cutting, copying and pasting in Word 2007 with the Paste button on the main ribbon. Recognizing that what they’d done so far wasn’t enough, Microsoft went a step further with Word 2010 by giving users a much better preview of what they’ll get when choosing a particular option.
Word 2010’s new Paste feature can be accessed two different ways; the first is by clicking the right mouse button in the spot where you want to paste something.
Note: You’ll only get all the Paste options shown if you have previously highlighted and copied some text from another source that has non-standard text in it.
The other way is by clicking on the Paste icon on the main ribbon:
Note: In order to get all of the icons to show up in the drop down menu, you first have to copy some non-standard text from another source.
Note the Set Default Paste option that has been added to the bottom of the drop down menu:
Clicking on it brings up a window for setting the defaults for a myriad of Word options:
We only need to look at the defaults for Cut, copy and paste:
Setting defaults for when you paste something, is actually a bigger deal than it might seem. Say for example you have grown used to using Ctrl-C and Ctrl-V for copying and pasting stuff from websites into your Word documents; normally the default is to paste what has been copied in its natural state, i.e. with all the web formatting in place.
If you change the default for Pasting between documents to Keep Text Only, you can save yourself the extra step of having to strip out the formatting manually.
At any rate, once you’ve got your defaults set the way you want, using the Paste feature works the same regardless of which way you access it. To use it, first copy some formatted text and/or graphics from a web site:
Next, open or resume working on a document in Word, then pick a spot in your document to paste the stuff you copied by clicking in the document; then, click the Paste icon. You should notice right away that things look different; instead of word choices, there are now icons.
To see how these icons work, slide your mouse slowly over the different options. Moving from left to right the icons represent: Keep Source Formatting, Merge Formatting, and Keep Text Only. You should be able to see what the pasted material will look like in your document as you move your cursor over the three icons.
Keep Source Formatting:
Merge Formatting:
And finally, Keep Text Only:
To actually paste in the copied material, click on the one you want and the copied material will be pasted into your document in the format you chose (in this case, Keep Source Formatting).
The new icon based Paste tool with preview should make cutting, copying and pasting a much easier task for anyone that does a lot of moving text around from different applications into Word.
Showing posts with label word. Show all posts
Friday, September 28, 2012
Thursday, September 6, 2012
Tip of the Day - Word 2010
Open Recently-used Files With Two Keystrokes
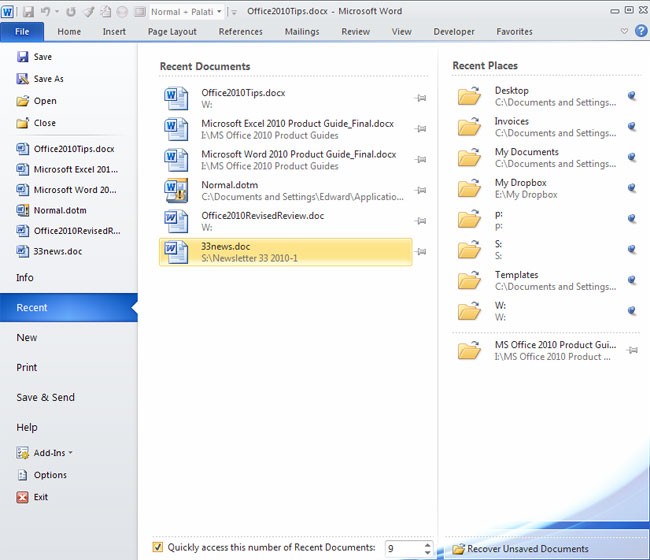
In older versions of Office, the File menu always displayed your recently-used documents, which you could open by typing Alt-F1, then the number of the document on the list (1 for the most recent, 2 for next most recent, etc.). This feature isn’t turned on by default in Office 2010, but you can activate it by entering the Backstage view, selecting Recent, and adding a checkbox next to "Quickly access this number of recent documents." Change the number to whatever number of documents you want to see on the list. In the Recent Documents list, you can "pin" a document to the list so that it will always appear, even if you haven't opened it recently. A nifty new feature lets you "pin" entire folders to the list of Recent Places in the right-hand column on the menu.
Wednesday, January 5, 2011
Creating Forms in Microsoft Word
Many people use Word to create "traditional forms." Traditional forms are
typically printed and reproduced to be filled-in by someone using a pen, pencil, or typewriter. They may include checkboxes, but often simply include response lines.
When putting together a form, many people type some text, and then follow that by a line for the form user to fill in. When creating the line, you have many different techniques you can use. The simplest is to use the underscore character (a shifted dash) to create the line. If you have multiple lines in the form you are creating, you won't get a professional look by using the underscore. This is due to the variable nature of proportional space fonts. When you use the underscore with other text on the same line, the right edges of your lines almost never line up.
To get around this problem, you can use tabs with leader characters to get a professional look. Simply type your text, followed by a space, then hit the Tab key. Format the line so that it has a right-aligned tab at the place you want the line to stop. Also make sure that the tab uses the underscore character for a leader. This approach looks much more professional than if you use underscores.
You can also use tables to put together your forms. For instance, you could use a two-column table. In the left column you would place your prompting text, and in the right put your underline characters. This is an easy approach, but it often places your fill-in-the-blank area (the underline) quite a distance from the prompting text. If you are creating simple forms, this may be more than acceptable, however.
Finally, you can use the drawing toolbar in Word to create your underlines. If you do this, you can place your underlines anywhere you want and make them any thickness you want. You display the drawing toolbar by selecting Toolbars from the View menu, and then making sure Drawing is selected.
If you want to frame your form, meaning to put a border around the whole thing, there are four ways you can do so. The first is by using a standard Word text box. If you do, however, make sure you create the text box before starting to design your form. If you don't, the text box displaces the text in your form and you need to move it all within the text box later. You can, of course, select the text that makes up your form, and then choose to insert a text box. In this case, the selected text (which is your form) is placed inside the text box. You may then have some reformatting to do to ensure your form appears as you expect.
Another way to put a border around your form is to use the rectangle tool from the drawing toolbar. Simply draw a rectangle around your form. If you use this method of bordering, some of the elements of your form (particularly if you are drawing lines) may disappear, depending on your drawing settings. You can get around this by selecting the rectangle and using the positioning tools on the drawing toolbar. The idea is to send the rectangle completely to the back of your form by selecting the Send to Back tool or the Send Behind Text tool.
A third way to create the border is to simply select all the paragraphs in your form and then choose Borders and Shading from the Format menu. You can select the type of border to create, and then choose a line effect for the border. There is one instance when this type of border will not work as expected: if you use different margin formatting on the paragraphs in your form. For instance, you may have a couple of paragraphs with a half-inch left and right indent, which makes the margins different than the other paragraphs in the form. In this case, this type of border will not look good.
If your form takes up an entire sheet of paper, you can add a border to the page itself. You do this by choosing Borders and Shading from the Format menu and then working with the Page Borders tab. The controls on this tab are very similar to those on the Borders tab, with the exception that they apply to the page as a whole.
A final word on putting your forms together: If you want to create check boxes, you can do so by using symbols. Choose Symbol from the Insert menu, and then make sure the Wingdings font is selected. Near the right side of the third row of symbols are a couple of boxes. These provide different effects, but work great for check boxes. Experiment a bit and select the box that is right for you.
Subscribe to:
Posts (Atom)